Leaderboard
728x15
Showing posts with label Fall. Show all posts

Baked Apple French Toast

I love apples in the Fall. And it is one of the few things my picky toddlers will eat! I wanted to make a special breakfast this morning and thought we'd try a Baked Apple French Toast. Very tasty! This recipe serves 4, but could be easily doubled if you're feeding a crowd.


Ingredients:
6 slices bread
1 apple, chopped
3 eggs
1/4 cup milk
1/2 teaspoon cinnamon
1 teaspoon vanilla
1 tablespoon brown sugar

Directions:
Preheat oven to 350 degrees. Grease a small baking dish and set aside.

In a bowl, whisk together eggs, milk, cinnamon, vanilla, and brown sugar until mixed. Stir in chopped apple.

Cut bread into cubes, approximately 1 inch wide. Stir bread cubes into egg mixture until well coated.

Pour mixture into baking dish. Bake at 350 for 14-16 minutes, or until set all the way through.


Enjoy!

Farm Fun: Corn Sensory Bin

I love sensory bins. If you're not familiar, it's a container (plastic under bed boxes work great!) filled with fun material for your little one to scoop, dig in, and explore.

I was inspired by some of the activities at our local pumpkin patch this fall, and by my sons' fascination with all things farm related, to try out this sensory experience. My toddlers loved this, and I only spent about $3 for the corn. Everything else we had around the house. So worth it and so fun!


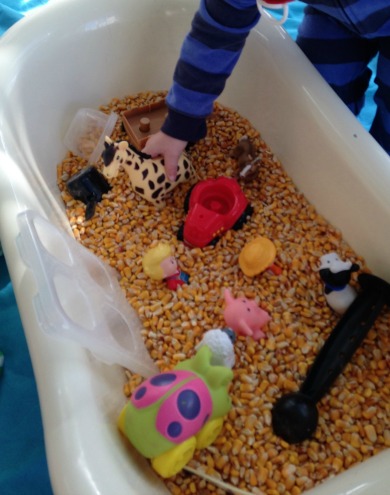
I actually use our old baby bathtub for our sensory bin (unless we are outside, then I use the water table). A word of advice though - put a piece of duct tape over the drain hole. Trust me.


I filled the tub with 10 pounds of shelled corn (also called feed corn) that I bought at our local farm supply store for under $3. I added in some of our Little People farm animals and figures, trucks, and various scoops, bowls, and containers that I had around the kitchen.

That's really the whole set up. I spread a huge sheet on the floor of our playroom, put the bin down, and let the boys explore.


They immediately began scooping and playing, even adding a giraffe and rhino to the "farm."


Small containers like ice trays and this baby food container tray are perfect for them to try to scoop and dump the corn.


It's even fun to sort the corn by hand!


My truck-loving son used the tub edge as a ramp and had fun watching his cars crash into the corn.


And of course, they had to test out actually getting into the tub! 


We enjoyed this activity so much! It entertained my boys for over an hour, which is an eternity in toddler time. Clean up was pretty easy - it was mostly contained to the sheet so I just bundled it up and dumped all the corn into a plastic trash bag. I stored the bag in a large plastic bin with a lid so we can play again another day! Perfect for the cold weather ahead.


Turkey Straw Cup

This week we've been working on crafts to decorate our Thanksgiving table - we've already made placemats and today I thought we'd do something to dress up our cups.  This project would be easy for older kids to help create, but I made them as a surprise for my 2 year olds.


I used these Take and Toss straw cups (affiliate link) so my measurements are based on them, but you can adapt this to any size cup - just make your base longer or taller as needed.

You will need:

  • Cups
  • Brown and Yellow craft foam
  • Googly eyes
  • Craft feathers
  • Mod Podge
  • Clear tape

Instructions:

First, cut your brown craft foam to size. For the Take and Toss cups you need a piece 10 inches wide and 3.5 inches high.


Next, cut out a small triangle of yellow craft foam for the nose. Glue this and 2 googly eyes to the center of your brown craft foam using Mod Podge. Allow to dry.


Once it is dry, flip it over and adhere your craft feathers to the back. I used 4 feathers, and taped 2 to each top corner, about 1/2 inch from the edge. You will want some room on each edge for when you wrap the foam around your cup.  If your feathers are curved, tape them so that the curve is facing you so that it curves away from the cup when wrapped.


Next, wrap the foam around the cup.  Apply Mod Podge to one edge to glue it together. I also recommend using a couple of pieces of clear tape to hold it closed until the Mod Podge dries.


There's your turkey! Remove the tape when the glue is dry, add your top and straw, and you're ready to go! A cute turkey cup to dress up your drink at Thanksgiving.  Enjoy!


Like this? Check out our Felt Turkey Puzzle and Thanksgiving Placemats! 

Make Thanksgiving Placemats with Corn Cob Painting

I host a big Thanksgiving dinner at my house every year with up to 20 people attending. It's one of my favorite days of the year because I love being surrounded by family. I'm so excited to include my toddlers this year in helping me to get ready for the big day by doing some crafts to decorate our table. Our first project is placemats for their seats at the table, and it turned out to have a bonus centerpiece too!


When I do art projects with my toddlers, it is all about the experience and not about the end product. I love giving them freedom to explore different media and see what they create. We picked up some decorative dried corn at the pumpkin patch and it inspired me to try painting with it.

Here's what you need:
  • White poster board
  • Scissors
  • Washable paint
  • Decorative dried corn
  • Paintbrush/sponge brush
  • Clear contact paper
  • Painter's tape

I cut the poster board to 19 x 13 inches to be a good size for a placemat. Of course you can make yours smaller or larger depending on the room you have at your table. I put out some washable paints, the corn, and some brushes out and let my toddlers lead.


They started right away painting the corn with a sponge brush.


Then we put a few globs of paint right on the poster board and they rolled the corn around in it. This made a really cool looking pattern and put some great color on the corn too!


Once they were done, I let it dry completely before moving to the next step - making it into a placemat.  I cut a piece of clear contact paper large enough to wrap around the poster board (about 1 inch on all sides).


Then I laid the contact paper sticky side up on my work surface. I pulled away the backing paper first from each corner and taped it down with painter's tape. Then I pulled the paper away from each side towards the middle. This helps it stay flat.


I placed the poster board painted side down on the contact paper and pressed firmly. I wrapped the edges around as tightly as possible. Contact paper is very forgiving, so if you don't get a good edge at first you can carefully lift and reposition it.  I cut a small slit in each corner so that it would wrap nicely.


Voila! A DIY placemat for your toddler's place at the Thanksgiving table. It's not waterproof enough for everyday use but it can be wiped down and should last through dinner, dessert, and a midnight snack. And as a bonus, our corn now has a lovely coat of paint and can be incorporated into our centerpiece. Most importantly, we had a lot of fun!


Felt Turkey Puzzle: Busy Bag Activity

We made a Felt Owl Busy Bag Activity in September and my boys are still playing with it. They call it the "owl puzzle" and love to get it out and put the pieces back together. This inspired me to make them a "turkey puzzle" to start gearing up for Thanksgiving.


This is easy to make and turns out really cute! You need:
  • Felt - brown, orange, yellow, red, blue, green and a background of your choosing (I did a cream color).
  • Googly eyes
  • Velcro
  • Scissors
  • Mod Podge or other fabric glue

Start by tracing a circle out of your brown felt. This will be the body. I used a saucer and it was the perfect size. Cut out your circle.


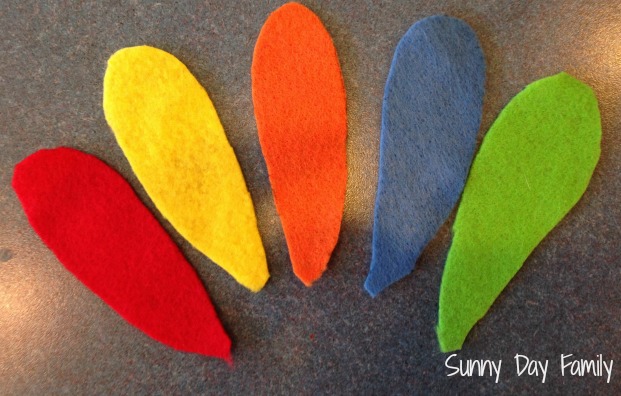
Then cut out 5 teardrop shapes for feathers - red, blue, orange, yellow, & green. I did the first one freehand and then traced each subsequent one so they were fairly uniform.


Cut out a small diamond out of yellow felt for the nose, a small teardrop shape out of red felt for the wattle, and a two feet shapes out of orange felt.


Add a small square of velcro to the back of your googly eyes. You want to put the stiffer hook side of the velcro on the back of the eyes so that it will stick to the felt.


I actually experimented with two different sized eyes - I liked the bigger ones but my 2 year old thought it looked like an owl, so he chose a smaller size. Go figure!

Next, cover the back of your brown felt circle in Mod Podge or fabric glue.  Adhere this to the center of your background piece of felt.


This is what your pieces will look like before assembly:


And after!


I gave the puzzle to one of my toddlers already assembled so he knew what it would look like. He immediately took all the pieces off and began trying to make his own turkey.


It was a little abstract but that's half the fun!


My toddlers love taking the turkey apart and putting it back together again. This is a great activity to put in a busy bag for restaurants, waiting rooms, or of course, the Thanksgiving table! No mess and they can play over and over again. Too cute and so fun!


Ring Around the Pumpkin: Stacking & Counting Activity for Toddlers

We picked up some small and medium sized pumpkins at the pumpkin patch last weekend and we've been having fun coming up with all sorts of ways to incorporate them into play activities and crafts, like our Chalkboard Pumpkins.

One of my toddlers loves to stack and sort things. We have also been working on practicing counting. I came up with an activity to combine both of these skills, upcycle some paper rolls, and let the boys have fun with their new pumpkins too.


You really don't need a lot of materials for this project at all. It sets up quickly and can be done many times over!

I collected some paper towel and toilet paper rolls, a marker, stickers, and an assortment of pumpkins and went to work.

First, our empty paper towel and toilet paper rolls.


I used a black marker to turn the toilet paper rolls into ghosts.


Then I cut the paper towel roll into rings about 1-2 inches wide. An assortment of sizes is good for this project.  

We decorated our rings with stickers because it is my kids' favorite craft activity and we had a bunch of cute little Halloween stickers (and it's great for fine motor skills). You can decorate the rings anyway you like - paint, draw, etc. If you want to work on letter skills it would be fun to draw a different letter on each one and make words. Or if you are working on color recognition, paint each ring a different color. The possibilities are endless!


Once our rings were decorated (still a work in progress in the photo above!) we brought them to our collection of small and medium sized pumpkins, which were grouped in a shallow basket. It's best to have pumpkins with many different sized stems.

From here, I just let my toddlers go. They were immediately engaged in putting the ghosts and rings on the stems. 


It was amazing to watch how they moved the ghosts and rings from one pumpkin to another, seeing how many they could fit on each stem and how many different ways they could arrange them. We worked on counting each stack of rings and talking about which stacks were big and which were small.

This was a wonderfully easy and engaging activity for both my toddlers. When we were done, we just packed up the rolls and will get them out again. This is definitely worth repeating!


Sneaky Veggies: Quick & Easy Pumpkin Mac & Cheese

Some days I am all about the ease and convenience of good old boxed macaroni and cheese. It's quick and I know my kids will eat it. But I also feel like I need to add in some veggies so that we are getting a well rounded meal. Today we added in everyone's favorite Fall flavor - pumpkin!


This was really so easy. I used the Back to Nature Organic mac & cheese, which has a milder cheese flavor. I think you need a mild cheese flavor for the pumpkin to blend in nicely.

Prepare the mac & cheese per the instructions on the box.  When adding in your milk, butter, and cheese powder, also add in 1/4 cup canned pure pumpkin (not pumpkin pie filling!). Mix thoroughly. Sprinkle a little nutmeg on top to taste. That's it!


My toddlers DEVOURED this. Like, asked for and finished a second bowl. It was really tasty, with just a hint of pumpkin flavor and loads of extra fiber and vitamins. Give it a try!

Chalkboard Pumpkins

I've seen so many wonderful ideas to decorate pumpkins without carving, but none of them seemed just right for my 2 year old twins. They love to paint, but they sometimes lose interest quickly and want a new piece of paper. I imagined them painting a pumpkin with one stroke then wanting a new one! I'm too frugal for that, so I wanted something that they could enjoy more than once.

They love chalk, and sometimes love erasing more than drawing. They really enjoy the repetition of drawing, erasing, and starting again. I thought we could incorporate this into our pumpkin decorating this year and our Chalkboard Pumpkin was born!


The secret to this project is this awesome chalkboard paint that I found at our local craft store. You can find it on Amazon (affiliate link). I used another chalkboard paint for a different pumpkin project and the DecoArt Clear worked a million times better. It doesn't peel and holds up to toddler heavy-handedness.


All you need is your pumpkin, chalkboard coating, and a sponge brush. Try to select as smooth a pumpkin as you can for a better drawing surface.


Apply your coating with the sponge brush in 2 coats - one going vertically down the pumpkin and one going horizontally around.  Wait an hour before applying the second coat.


Once your second coat is dry (mine took about an hour), prime the surface by rubbing some chalk on it and wiping off.


That's it! Let your toddlers enjoy drawing and erasing as much as they want. I got mine started with a jack-o-lantern face and let them embellish from there. It was fun! And it's great because we can do it over and over again.


Much better than a one time painting project. Give it a try and let me know what you think!
Leaderboard