Leaderboard
728x15
Showing posts with label Thanksgiving. Show all posts

Turkey Straw Cup

This week we've been working on crafts to decorate our Thanksgiving table - we've already made placemats and today I thought we'd do something to dress up our cups.  This project would be easy for older kids to help create, but I made them as a surprise for my 2 year olds.


I used these Take and Toss straw cups (affiliate link) so my measurements are based on them, but you can adapt this to any size cup - just make your base longer or taller as needed.

You will need:

  • Cups
  • Brown and Yellow craft foam
  • Googly eyes
  • Craft feathers
  • Mod Podge
  • Clear tape

Instructions:

First, cut your brown craft foam to size. For the Take and Toss cups you need a piece 10 inches wide and 3.5 inches high.


Next, cut out a small triangle of yellow craft foam for the nose. Glue this and 2 googly eyes to the center of your brown craft foam using Mod Podge. Allow to dry.


Once it is dry, flip it over and adhere your craft feathers to the back. I used 4 feathers, and taped 2 to each top corner, about 1/2 inch from the edge. You will want some room on each edge for when you wrap the foam around your cup.  If your feathers are curved, tape them so that the curve is facing you so that it curves away from the cup when wrapped.


Next, wrap the foam around the cup.  Apply Mod Podge to one edge to glue it together. I also recommend using a couple of pieces of clear tape to hold it closed until the Mod Podge dries.


There's your turkey! Remove the tape when the glue is dry, add your top and straw, and you're ready to go! A cute turkey cup to dress up your drink at Thanksgiving.  Enjoy!


Like this? Check out our Felt Turkey Puzzle and Thanksgiving Placemats! 

Make Thanksgiving Placemats with Corn Cob Painting

I host a big Thanksgiving dinner at my house every year with up to 20 people attending. It's one of my favorite days of the year because I love being surrounded by family. I'm so excited to include my toddlers this year in helping me to get ready for the big day by doing some crafts to decorate our table. Our first project is placemats for their seats at the table, and it turned out to have a bonus centerpiece too!


When I do art projects with my toddlers, it is all about the experience and not about the end product. I love giving them freedom to explore different media and see what they create. We picked up some decorative dried corn at the pumpkin patch and it inspired me to try painting with it.

Here's what you need:
  • White poster board
  • Scissors
  • Washable paint
  • Decorative dried corn
  • Paintbrush/sponge brush
  • Clear contact paper
  • Painter's tape

I cut the poster board to 19 x 13 inches to be a good size for a placemat. Of course you can make yours smaller or larger depending on the room you have at your table. I put out some washable paints, the corn, and some brushes out and let my toddlers lead.


They started right away painting the corn with a sponge brush.


Then we put a few globs of paint right on the poster board and they rolled the corn around in it. This made a really cool looking pattern and put some great color on the corn too!


Once they were done, I let it dry completely before moving to the next step - making it into a placemat.  I cut a piece of clear contact paper large enough to wrap around the poster board (about 1 inch on all sides).


Then I laid the contact paper sticky side up on my work surface. I pulled away the backing paper first from each corner and taped it down with painter's tape. Then I pulled the paper away from each side towards the middle. This helps it stay flat.


I placed the poster board painted side down on the contact paper and pressed firmly. I wrapped the edges around as tightly as possible. Contact paper is very forgiving, so if you don't get a good edge at first you can carefully lift and reposition it.  I cut a small slit in each corner so that it would wrap nicely.


Voila! A DIY placemat for your toddler's place at the Thanksgiving table. It's not waterproof enough for everyday use but it can be wiped down and should last through dinner, dessert, and a midnight snack. And as a bonus, our corn now has a lovely coat of paint and can be incorporated into our centerpiece. Most importantly, we had a lot of fun!


Felt Turkey Puzzle: Busy Bag Activity

We made a Felt Owl Busy Bag Activity in September and my boys are still playing with it. They call it the "owl puzzle" and love to get it out and put the pieces back together. This inspired me to make them a "turkey puzzle" to start gearing up for Thanksgiving.


This is easy to make and turns out really cute! You need:
  • Felt - brown, orange, yellow, red, blue, green and a background of your choosing (I did a cream color).
  • Googly eyes
  • Velcro
  • Scissors
  • Mod Podge or other fabric glue

Start by tracing a circle out of your brown felt. This will be the body. I used a saucer and it was the perfect size. Cut out your circle.


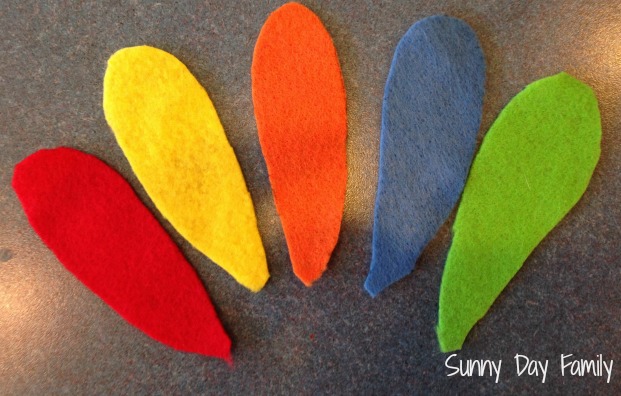
Then cut out 5 teardrop shapes for feathers - red, blue, orange, yellow, & green. I did the first one freehand and then traced each subsequent one so they were fairly uniform.


Cut out a small diamond out of yellow felt for the nose, a small teardrop shape out of red felt for the wattle, and a two feet shapes out of orange felt.


Add a small square of velcro to the back of your googly eyes. You want to put the stiffer hook side of the velcro on the back of the eyes so that it will stick to the felt.


I actually experimented with two different sized eyes - I liked the bigger ones but my 2 year old thought it looked like an owl, so he chose a smaller size. Go figure!

Next, cover the back of your brown felt circle in Mod Podge or fabric glue.  Adhere this to the center of your background piece of felt.


This is what your pieces will look like before assembly:


And after!


I gave the puzzle to one of my toddlers already assembled so he knew what it would look like. He immediately took all the pieces off and began trying to make his own turkey.


It was a little abstract but that's half the fun!


My toddlers love taking the turkey apart and putting it back together again. This is a great activity to put in a busy bag for restaurants, waiting rooms, or of course, the Thanksgiving table! No mess and they can play over and over again. Too cute and so fun!


Leaderboard