Leaderboard
728x15
Showing posts with label frugal. Show all posts

DIY Reusable Coloring Book Plus 100+ Free Coloring Pages


My boys love to color. But they are still pretty little, so sometimes "coloring" means drawing a few squiggles and then asking for a new page. Those coloring books can add up! I love using free printable pages (and will share some favorites at the end of this post) but paper and ink can get pricey too. I found a great way to keep my boys happy and save some money by making our own reusable coloring book!


This project is so easy - you might have everything you need at home already!


All you need is:
  • 3 Ring Binder
  • Sheet Protectors (I like Heavyweight or Super Heavyweight)
  • Coloring Pages or plain paper
  • Dry Erase markers or crayons - get the washable kind!

Put your coloring pages or plain paper in the sheet protectors. You can print free coloring pages online (keep reading for links to some of my favorites) or tear them out of a coloring book. You can put them in the sheet protectors back to back or I like to do a single sheet in each protector so that you have a mix of pre-printed pictures and blank pages.

One of my favorite parts of this book is that you can totally customize it to your kids' favorite characters, holidays, whatever they like!


Once your pages are loaded just place them in your 3 ring binder. Make it as large or small as you'd like! 

I love binders that you can slip your own cover into. If that's what you have, I've made you a free printable cover too:
CLICK HERE to download your free cover.

Once everything is assembled you are ready to go. Give your kids some washable dry erase markers or crayons and let them color!


One of my boys LOVES to erase his art - it wipes off with a paper towel but you may need to give it a good cleaning with water (or a baby wipe!) every now and then to keep it totally clean.


Ready for more coloring!


Again, you can fill your book with anything that your kids will enjoy. I've pulled together some of my favorite free coloring page resources to give you a head start:

90+ Coloring Pages from Kids Activities Blog

70 Coloring Pages from My Life & Kids

Huge Coloring Page Collection (great holiday sets!) from What Do We Do All Day?

Coloring & Activities Collection from Every Star is Different

Horse Coloring Page from Arts & Crackers

Apple Coloring Pages from The Good Long Road

Space Coloring Pages from In the Playroom

Snowflake Coloring Pages from In the Playroom


Dinosaur Coloring Pages from Red Ted Art

Penguin Coloring Pages from Kid's Creative Chaos

Design Your Own Monster Truck from School Time Snippets

Number Coloring Pages from 3 Dinosaurs

Dolphin Coloring Pages from Itsy Bitsy Fun

And you can find your favorite character sets here:


Need any supplies to make your coloring book? Here you go! (affiliate links)


Bubble Wrap Painting

Painting on Bubble Wrap

We had so much fun making our Bubble Wrap Road that I thought there must be something else we can do with our big roll of bubble wrap. My boys love to paint, so why not put the two together and see what happens?

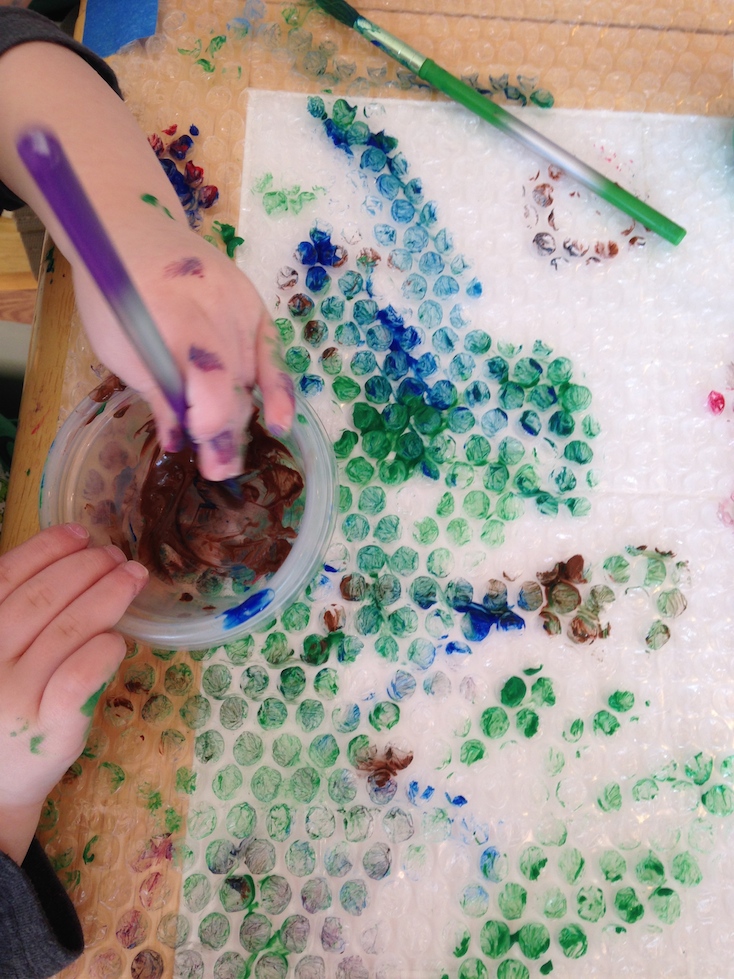
We had a lot of fun with this craft, and it's pretty simple to set up. I put a big sheet of bubble wrap down on our kitchen table and taped it down with painter's tape. I poured some washable paint into small cups, put out some brushes, and invited the boys to create.


They started with the brushes and loved how bumpy their "canvas" was.


Then they really got into it and started mixing colors.


They asked for more colors and of course I obliged.


Then they gave up the brushes all together and started finger painting. It was fun to pop the bubbles and make art at the same time! Even my "no mess" boy got into this one.


I hung our finished project on the sliding glass door to dry, and it was quite pretty with the sun shining through! We could easily turn this into a sun catcher craft. 


This was a great project that checked all my favorite boxes - easy, inexpensive (save those packing materials!), sensory and fun. Both of my boys enjoyed it immensely and we will definitely try it again!

Need any of the materials used in this activity? Here you go! (affiliate links)


Looking for craft storage? Check out my Organizing & Totes page!


Cupid's Mailbox Activity with Free Printable Valentine Cards


My Santa's Mailbox has been my most popular activity on the blog so far, and it was one of our favorites around Christmas. Now that Valentine's Day is coming up I thought we'd make one for our Valentines too!

This is a very easy craft that turns into a fun activity for toddlers and preschoolers. It would work great in a pre-school classroom setting for collecting Valentine cards, or at home just for fun! And it recycles a baby wipes box, which makes it frugal too.

To make the mailbox, you will need:

  • Empty baby wipes box. A tissue box will also work but it will not be as sturdy and may not last for long.
  • Red, pink, and white felt.
  • Mod Podge or other fabric glue
  • Scissors

Directions:

Cut out a piece of red felt large enough to wrap around the base of your wipes box. I used a Huggies box and mine was 3.75" x 23". Coat the base of the box in Mod Podge and wrap the red felt around. Trim any excess around the bottom.


Cut out heart shapes from the pink and white felt. I do hearts like I learned in kindergarten, by folding the felt in half and cutting a half-heart around the fold. It's the only way I can make them even.


Coat the backs of your felt hearts with Mod Podge and adhere to your box. If your felt is thin, you may have some glue leak through, so apply sparingly. I glued a few to the top too. Allow to dry.


Your mailbox is done! Now you need some Valentines to put inside. I've put together a set of printable cards that can be cut to fit through the top (depending on your box of course). Print these out on card stock for best results.


Now you're ready to play! Your toddler will have lots of fun putting the cards into the mailbox. 


And you can play a fun matching game with the cards! Put one of each kind in the mailbox, then show your toddler a card and have him find the match. You can also have them draw their own Valentines for friends and family to keep inside their mailbox.

Lots of fun possibilities!  Happy Valentine's Day!

Need any of the materials used in this craft? Here you go: (affiliate links)


Need help organizing your craft supplies? Check out my Organizing & Totes page!

Indoor Sensory Play with Snow


We had a snow day! It was so fun seeing my boys really enjoying playing in the snow for the first time. Last year they were just too little and hated it.

The next day we still had a lot of snow... but also wind chills around -6. I just couldn't take them out in that kind of cold, but they still really wanted to play in the snow. So what did we do? Brought the snow inside, of course!

I set up our old baby bathtub - it's my favorite sensory bin. It worked especially well for the snow because I could just drain it when we were done. I braved the cold and scooped some snow from our patio into the tub. Then I laid down a big water-repellant sheet and put the tub on top. Time to play!


I gave the boys some scoops and containers from the kitchen. I didn't know if they would want to touch the snow with their hands but they dove right in!


My truck lover grabbed several of his cars and practiced some snow driving.


While my animal lover decided to let his favorites do some playing in the snow.


He even made sure his hippo got a taste of a snowball!


This activity was so much fun - we did it 2 days in a row! As long as you've got some snow, a few scoops and bowls, and some water resistant toys you are all set. It was such a great way for my boys to experience snow play when the temperatures made it impossible to be outside for long. Next time you've got a snow day give it a try!

Looking for some snow inspired crafts? Try my Coffee Cup Snowman and Build a Snowman Busy Bag too!

Need any of the materials in this activity? Here you go: (affiliate links)


Protect your floors with a bleacher blanket from Thirty One! Shop here (consultant link)


Coffee Cup Snowman


We love snowmen in my house. I have lots of snowman decorations around the house in the winter, and of course, Olaf has become a very big celebrity with my boys.

I also love coffee. As I was making myself a cup this morning, I looked at my K-cup and thought hmmm... this could become part of a snowman (the mind of a blogger, right?). Since we have been stuck inside the house this week with colds and frigid temperatures I will take just about anything and make it into a craft project.


I cleaned out my K-cup, grabbed a few other things from my craft bin, and we made this really cute, easy snowman craft. It was great fine motor practice for my boys and turned out really well!


Please note: this activity features small parts. Children should be closely supervised when doing this craft. This craft may not be appropriate for all children.

You will need:


Clean, used K-cup
Black marker
Styrofoam cup
3 paper fasteners
3 pipe cleaners - 2 brown and one color of your choice

Directions:

Remove the foil, coffee, and liner from your K-cup. Thoroughly wash and dry.  Flip upside down, and draw on a face with black marker.


Thread a colored pipe cleaner through the hole in the top of the K-cup. Twist the top portion into your desired shape for a hat (ours was a bow). Be sure there is enough of the pipe cleaner coming through the bottom to stick through the styrofoam cup (at least an inch).

Now let your child assemble the snowman!

Have them punch the paper fasteners into the styrofoam cup for the buttons.


Push the 2 brown pipe cleaners into the sides of the cup to make arms. Twist the ends so that they form a V for hands.


Push the head onto the top of the cup, pushing the end of the pipe cleaner through the top to secure the head to the base.


All done! A happy snowman! He is now ready to join the rest of my snowman decorations. Since this craft does have small pieces, he is definitely a decoration and not a toy.

Like this snowman craft? Try my Build a Snowman Busy Bag next!

Need any of the materials used in this craft? Here you go! (affiliate links)


Looking for craft storage? Check out the storage & utility options available from Thirty-One! (consultant link)

Mom's Memory a Day: Free Printable Journal


Kids grow up so fast. It seems like a blink of an eye and my newborns are already toddling towards 3. I have taken a million pictures of them but I have been terrible at keeping up with baby books and journaling. I always have the best intentions but fall short at the end of a long, tiring day.

I recently tried a new approach to recording my mom memories and it is going so well that I want to share it. It truly works and it only takes 5 minutes a day!


The idea is simple - at the end of every day, take 5 minutes and write down one moment from your day. A funny quote (kids say the BEST things and we never remember them!). Something your kids did that made you smile (or scream). A quick snapshot of your life each day. You don't need to write a lot - there's not enough room for that - because the idea is to record a moment that will become a memory.

All those little moments will soon add up to a lifetime of memories. And when you inevitably feel like time has flown by you will be able to look back and remember all those little moments that make up our lives as moms.

Want to give it a try? It's free! Here's a preview of the three types of pages included - click here to access the files and start your journal today!


Download your free journal now!

5 Ways to Play with Balloons


There's just something about balloons. My boys get so excited whenever they see one! We had a balloon drop at our New Year's playdate and they went absolutely nuts. We had a few left over and found some fun ways to play with them that I'd love to share with you!


Please keep in mind that latex balloons can be a choking hazard. Activities should be closely supervised.

1. Balloons in a Box. Set out any box, basket, or large bin that you have (mine is a utility tote, a laundry basket also works great) and let your kids go to town trying to fill it with balloons. This works best when you have more balloons than will fit in your bin, because they have to try to get them in without any popping out! This can also become a good learning activity if you work on sorting or stacking by color.


2. Balancing Balloons. Lay out plastic cups on the floor and have your kids try to balance the balloons on top. We put ours in a big circle and tried to see how many we could get to stay on before they fell over.  So fun!


3. Balloon Baseball. My picture is blurry because my toddlers would not stop moving with this one! Just give them an empty paper towel roll and let them bat away at the balloons. Mine loved batting them on the floor and trying to hit my pitches. An awesome way to have some sporty practice inside without breaking anything.


4. Balloon Kick Races. Set up a finish line at the end of the room and see if you can kick the balloon to it! My twins had a blast racing to see who could kick the balloon to the line first, and who could kick it the farthest.


5.  Balloon Art. This was probably the biggest hit of all with my little artists. Use the balloons as a canvas for markers. They loved drawing on their balloons and exploring the different ways that they could turn them into works of art. This is also a nice wind down activity after the batting practice and kick races!

Next time you've got some balloons, give these activities a try. And if you're looking for more activities using things you may have around the house, try my 10 Awesome Things to Do with Cookie Cutters too!

Make a Bubble Wrap Road


I'm putting away our Christmas wrapping supplies and discovered a giant roll of bubble wrap that we didn't use. I thought instead of packing it away that I'd make something fun for us to do inside - it's way too cold to play outside today! So our Bubble Wrap Road was born.


You only need 2 things for this activity - a big roll of bubble wrap (or any pieces you have laying around from packages) and painter's tape. I always have a roll of painter's tape in my craft bag because it pulls off the floor or walls cleanly. (Note: Take care when using tape on wood floors. Some tape can damage wood floors, especially if left on for long periods of time.)


I laid out the bubble wrap on the floor and taped the sides down with the painter's tape. I made a sort of U shape for our space.


I put small dashes of tape in the center of the wrap to make lanes.


Then I got out our big bucket of toy trucks and invited the boys to play!


They loved their new "bumpy road"! We found that tractors and trucks with nubby tires make the best noise on the bubble wrap.


Of course there was plenty of bubble popping with fingers and toes too.


This was such an easy and inexpensive activity to put together - we will definitely do it again. I think our next road will include some ramps and we might even go up the walls!

Looking for more indoor fun? Try our 10 Indoor Boredom Busters or our Sensory Bin activity.

Need any of the materials used in this activity? Here you go! (affiliate links)


Looking for craft storage? Check out my Organizing & Totes page!
Leaderboard