Leaderboard
728x15
Showing posts with label play. Show all posts

Make a Playset for Dinosaur Toys with Recycled & Natural Materials

DIY Dinosaur Habitat Playset

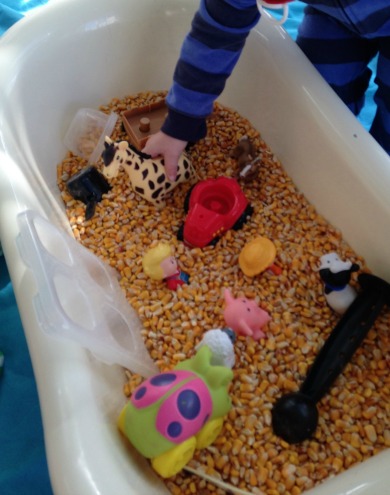
My boys love their dinosaur toys. And playing with dirt. It's too cold to take our dinosaur toys outside to play, so I thought I'd pull together a dinosaur playset that we could keep inside. I used things we had around the house and yard, and it came together pretty quickly at almost no cost!


Here's what you need, though feel free to be inspired and add your own unique elements!
  • Under bed sized storage box
  • Green felt
  • Glue
  • Bowl
  • Cardboard egg carton
  • Mulch
  • Sticks/leaves, tree clippings
  • Plastic dinosaur toys
To make your dinosaur play set, start with an under bed sized storage box. I found this to be just the right size for my two toddlers (almost preschoolers!) to play, and I love the fact that it has a lid so I can put it away when we are not playing with it. And I had one on hand that I wasn't using - bonus!


Use glue to line the box in green felt. Allow to dry.


Add a small bowl to be your watering hole.


Use a cut up cardboard egg carton to make rocks for climbing.


Add in mulch, sticks, branches from trees, whatever natural elements you have easy access to.


Ready to play! I could not wait for my boys to wake up from their nap to show them their new playset. They loved it!

One dino took a drink from the watering hole.


And another took a bath!


This dinosaur did some rock climbing.


And this one had a snack.


This was a really easy project to put together - once your box is lined and dry it takes no time at all to create a really fun habitat for your dinosaur toys.  And it definitely does not have to be limited to dinosaur play - our farm animals have spent some time in the playset too!

This has also been a nice way to play with some (free!) natural materials when it's been too cold to play outside. The possibilities are endless!

Need any materials for this activity? Here you go! (affiliate links)


Indoor Sensory Play with Snow


We had a snow day! It was so fun seeing my boys really enjoying playing in the snow for the first time. Last year they were just too little and hated it.

The next day we still had a lot of snow... but also wind chills around -6. I just couldn't take them out in that kind of cold, but they still really wanted to play in the snow. So what did we do? Brought the snow inside, of course!

I set up our old baby bathtub - it's my favorite sensory bin. It worked especially well for the snow because I could just drain it when we were done. I braved the cold and scooped some snow from our patio into the tub. Then I laid down a big water-repellant sheet and put the tub on top. Time to play!


I gave the boys some scoops and containers from the kitchen. I didn't know if they would want to touch the snow with their hands but they dove right in!


My truck lover grabbed several of his cars and practiced some snow driving.


While my animal lover decided to let his favorites do some playing in the snow.


He even made sure his hippo got a taste of a snowball!


This activity was so much fun - we did it 2 days in a row! As long as you've got some snow, a few scoops and bowls, and some water resistant toys you are all set. It was such a great way for my boys to experience snow play when the temperatures made it impossible to be outside for long. Next time you've got a snow day give it a try!

Looking for some snow inspired crafts? Try my Coffee Cup Snowman and Build a Snowman Busy Bag too!

Need any of the materials in this activity? Here you go: (affiliate links)


Protect your floors with a bleacher blanket from Thirty One! Shop here (consultant link)


5 Ways to Play with Balloons


There's just something about balloons. My boys get so excited whenever they see one! We had a balloon drop at our New Year's playdate and they went absolutely nuts. We had a few left over and found some fun ways to play with them that I'd love to share with you!


Please keep in mind that latex balloons can be a choking hazard. Activities should be closely supervised.

1. Balloons in a Box. Set out any box, basket, or large bin that you have (mine is a utility tote, a laundry basket also works great) and let your kids go to town trying to fill it with balloons. This works best when you have more balloons than will fit in your bin, because they have to try to get them in without any popping out! This can also become a good learning activity if you work on sorting or stacking by color.


2. Balancing Balloons. Lay out plastic cups on the floor and have your kids try to balance the balloons on top. We put ours in a big circle and tried to see how many we could get to stay on before they fell over.  So fun!


3. Balloon Baseball. My picture is blurry because my toddlers would not stop moving with this one! Just give them an empty paper towel roll and let them bat away at the balloons. Mine loved batting them on the floor and trying to hit my pitches. An awesome way to have some sporty practice inside without breaking anything.


4. Balloon Kick Races. Set up a finish line at the end of the room and see if you can kick the balloon to it! My twins had a blast racing to see who could kick the balloon to the line first, and who could kick it the farthest.


5.  Balloon Art. This was probably the biggest hit of all with my little artists. Use the balloons as a canvas for markers. They loved drawing on their balloons and exploring the different ways that they could turn them into works of art. This is also a nice wind down activity after the batting practice and kick races!

Next time you've got some balloons, give these activities a try. And if you're looking for more activities using things you may have around the house, try my 10 Awesome Things to Do with Cookie Cutters too!

Make a Bubble Wrap Road


I'm putting away our Christmas wrapping supplies and discovered a giant roll of bubble wrap that we didn't use. I thought instead of packing it away that I'd make something fun for us to do inside - it's way too cold to play outside today! So our Bubble Wrap Road was born.


You only need 2 things for this activity - a big roll of bubble wrap (or any pieces you have laying around from packages) and painter's tape. I always have a roll of painter's tape in my craft bag because it pulls off the floor or walls cleanly. (Note: Take care when using tape on wood floors. Some tape can damage wood floors, especially if left on for long periods of time.)


I laid out the bubble wrap on the floor and taped the sides down with the painter's tape. I made a sort of U shape for our space.


I put small dashes of tape in the center of the wrap to make lanes.


Then I got out our big bucket of toy trucks and invited the boys to play!


They loved their new "bumpy road"! We found that tractors and trucks with nubby tires make the best noise on the bubble wrap.


Of course there was plenty of bubble popping with fingers and toes too.


This was such an easy and inexpensive activity to put together - we will definitely do it again. I think our next road will include some ramps and we might even go up the walls!

Looking for more indoor fun? Try our 10 Indoor Boredom Busters or our Sensory Bin activity.

Need any of the materials used in this activity? Here you go! (affiliate links)


Looking for craft storage? Check out my Organizing & Totes page!

10 Indoor Boredom Busters


Brrr! It was cold and rainy here yesterday and I had to pull out all my tricks to keep my kids entertained inside. Since it's just the beginning of bad weather season I thought I'd share some of my favorite easy indoor activities. These are perfect quick fixes to keep kids entertained during long days inside.


1. Have a picnic. Turn snack or meal time into an event! My toddlers find this so amusing. I just lay out a blanket in the living room and we pretend we are dining outside on a beautiful summer day. There's definitely a mess potential here but my boys are usually so taken with the novelty of eating on a blanket that they keep their food pretty well contained.

2. Make a fort. I'm all about intricate indoor forts but I promised this would be a list of easy activities.  When I'm in a pinch, I just throw a sheet over the kitchen table and call it done. Kids have amazing imaginations and I love to let them use them! The sheet fort is always a hit.


3. Pillow mountain. This is one of our favorites.  I just pile as many pillows as I can find - bed pillows, throw pillows, cushions, whatever - into a mountain in the living room and let them go. They have a ball climbing and diving on the "mountain." And its nice and soft so no one gets hurt.

4. Jumping on the bed. Similar to pillow mountain - we have an air mattress which I blow up and let them use as a trampoline. They love to bounce and tumble, and it's only a couple of inches off the ground so if they fall off it's OK. Just be sure to have plenty of space for this one so they don't roll off into a piece of furniture.

5. Sheet sleds. This one came about quite by accident when I was trying to fold laundry while my kids were playing (silly me!). Have them sit on the end of a sheet and hold on while you pull them around. My kids love this!


6. Turn off the lights. This works so well on these short days where it gets dark before dinner time. I turn off the lights, give them flashlights, and let them explore. Simple and fun!

7. Pipe cleaners, colanders, play dough. Look for fun things around the house that your kids can use to create. Mine love putting pipe cleaners into a colander and into play dough to create all sorts of wacky art.


8. Go swimming. In the bath tub! Letting them splash and play in the tub in the middle of the day is great fun. Add in some awesome toys, bath crayons, and bubbles and you're set.

9. Make a sensory bin. This might sound complicated but its just a tub filled with fun materials to explore. Check out my Farm Fun Bin for more details.


10. Give them a cardboard box. Seriously, this is all they need to be entertained sometimes. A huge box can become a car (push them around in it for major laughs!), a playhouse, an art canvas - let their imaginations go wild!

Hope these activities help you enjoy some of the long days ahead. I'd love to hear your favorite indoor boredom busters too!

Farm Fun: Corn Sensory Bin

I love sensory bins. If you're not familiar, it's a container (plastic under bed boxes work great!) filled with fun material for your little one to scoop, dig in, and explore.

I was inspired by some of the activities at our local pumpkin patch this fall, and by my sons' fascination with all things farm related, to try out this sensory experience. My toddlers loved this, and I only spent about $3 for the corn. Everything else we had around the house. So worth it and so fun!


I actually use our old baby bathtub for our sensory bin (unless we are outside, then I use the water table). A word of advice though - put a piece of duct tape over the drain hole. Trust me.


I filled the tub with 10 pounds of shelled corn (also called feed corn) that I bought at our local farm supply store for under $3. I added in some of our Little People farm animals and figures, trucks, and various scoops, bowls, and containers that I had around the kitchen.

That's really the whole set up. I spread a huge sheet on the floor of our playroom, put the bin down, and let the boys explore.


They immediately began scooping and playing, even adding a giraffe and rhino to the "farm."


Small containers like ice trays and this baby food container tray are perfect for them to try to scoop and dump the corn.


It's even fun to sort the corn by hand!


My truck-loving son used the tub edge as a ramp and had fun watching his cars crash into the corn.


And of course, they had to test out actually getting into the tub! 


We enjoyed this activity so much! It entertained my boys for over an hour, which is an eternity in toddler time. Clean up was pretty easy - it was mostly contained to the sheet so I just bundled it up and dumped all the corn into a plastic trash bag. I stored the bag in a large plastic bin with a lid so we can play again another day! Perfect for the cold weather ahead.


Make Dinosaur Tracks with Homemade Play Dough


It's a rainy day here so I thought we'd get out one of our favorite activities - making dinosaur tracks with our homemade play dough. This is so simple but it entertains my toddlers every time!


It starts with this awesome homemade play dough from The Imagination Tree. She is not exaggerating that it is the best no cook play dough recipe ever. We made some (the blue one in my photos) MONTHS ago and it is still soft. The texture is far better than any I've ever purchased in a store.

From there we just added in a couple of plastic dinosaurs I bought on clearance at the drug store for a little over $1. They are just the right size and have great little feet for making tracks.


Then I just let the boys go to town making footprints in the play dough. Sorry my "action shots" are so blurry but they wouldn't keep the dinosaurs still because they were having so much fun!


This is seriously such a fun, easy way to pass some time on a rainy day. Now whenever I see little animal figures in stores I always check their feet to see if they would make great tracks! Enjoy!

10 Awesome Things to do with Cookie Cutters


I have had my set of 101 cookie cutters (affiliate link) for years, long before I had kids. But now that I'm raising toddlers I find that I am using them all the time. So much so that I want to share our favorite activities with them!


1. Make Cookies.  Let's get the obvious one out of the way. Of course you can use them for your favorite sugar cookie recipe (Here's mine). This is a really easy recipe that you can get your kids involved in measuring, mixing, and cutting out the shapes. They are great for decorating too!

2. Dog Cookies. We love to make dog cookies for our 2 pups, and they could not be easier to do. All you need is 1 cup of flour and 1 4 oz. jar of baby food. Mix, roll out, and use your cookie cutters. Bake at 350 degrees for 15-20 minutes. Done! So simple for little ones to help mixing, rolling, and cutting and all the ingredients are safe even if you have toddlers who like to sample.

If you don't have a dog, you can still do this project and donate your cookies to your local animal shelter.


3. Fun Food Shapes. I have a picky eater, and I use cookie cutters for sandwiches, toast, cheese, everything! Sometimes my picky one will actually taste a new food just because it's got a shape that he recognizes and likes. Not always, but it's definitely one of my favorite tricks.

4. Play Dough. Our cookie cutters get used on a daily basis to make shapes out of play dough. My little ones love to pick out their favorite shapes and make dinosaurs that roar and trucks that go. Seriously, we do this pretty much every day and they love it.


5. Contact Paper Collage. I love clear contact paper. I have about 10 rolls of it. On a rainy day, I just hang some up (usually on our sliding glass door, but a plain wall works just as well), sticky side out, with painter's tape. Cookie cutters are great because they are light enough to stick and make great 3-D art. The boys let their imaginations go wild and make all sorts of scenes.

6. Shapes & Letters Practice.  My set comes with a full complement of letters and numbers. We use these to practice - I'll put all the letters in a bag and let them draw one out and guess what it is. I also use it with our favorite alphabet book - Dr. Seuss's ABC (affiliate link) and let them match the letters to the book. We also like to put the numbers in order and practice counting.

7. Baking Soda Fizzy Fun.  Love, love, love this project from Toddler Approved. We do it with more than just our letter cutters, it's very fun with animal shapes too.

8. DIY Coloring Pages.  I posted about this project here. It's a favorite and a big money saver over coloring books.


9. Painting. We love to paint, but one of my toddlers really hates "mess". So we use our cookie cutters like stamps. Dip them in a little washable paint and let them stamp out shapes to their heart's content. Since they only create an outline, they can also have fun filling them in and adding details.

10. Buried Treasure Sensory Bin.  I love sensory bins. They are so easy and really keep the kids entertained. If you're unfamiliar, all you need is a plastic bin (I like plastic under bed boxes) and some sensory material. We've had great fun with oats, old stale Cheerios, dried beans, play sand, etc. I like to bury our cookie cutters in the bins and let the boys find and dig them out. Be sure to do this one outside or cover your floor with an old sheet - it can get messy!

What other crafts and projects can be done with cookie cutters? I'd love to hear your ideas!


Leaderboard