Leaderboard
728x15
Showing posts with label winter. Show all posts

No Bake Snowflake Cookies


It's snowing! I love seeing how excited my boys are watching the snow fall. I thought we should make a special snow themed treat for snack today, but I was limited to what we had on hand and it needed to be fast because my boys were ready to go outside and play! These No Bake Snowflake Cookies fit the bill - quick, 3 ingredients, relatively healthy, and fun to make.

I was inspired by these Frosted Animal Cookie Treats on Mini Monets & Mommies, but I wanted something with a little less sugar. I thought graham crackers would be a good substitute. We had snowflake sprinkles left over from baking Christmas cookies and they were just what I needed to transform ordinary cookie balls into a snowy surprise. Perfect for an afternoon viewing of Frozen! Here's what you do:

Ingredients
Graham Crackers (12 full sheets, approximately 2 cups crushed)
3/4 cup Cream Cheese, softened (6 oz)
Snowflake shaped sprinkles


Directions
Crush graham crackers into fine crumbs. I suggest using a food processor because you want the crumbs to be very small, almost like sand.

In a large bowl, mix your graham cracker crumbs, cream cheese, and sprinkles. I didn't measure the sprinkles, I just added in a handful. You can put in as few or as many as you like, just be sure to save some for the end.

Mix until thoroughly combined into a dough consistency. You will probably need to use your hands! This is fun for kids to help with too.

Roll dough into approximately 1 inch round balls. Press down to flatten into a cookie shape. Decorate with your remaining sprinkles, pressing them gently into each cookie.

Place your cookies into the refrigerator to set (or if you're impatient like me, into the freezer for about 45 minutes.)  They will not be hard, but will have an almost cookie dough like consistency. Store them in the refrigerator (if you don't eat them all in one sitting!).


That's it! My toddlers absolutely loved these - and I don't feel guilty when they ask for cookies and I can give them these. I don't even want to admit how many I ate myself. You can experiment with different flavors of graham crackers - mine were honey, but I think cinnamon or chocolate would be equally delicious.

Want more snow day fun? Check out my Indoor Sensory Play with Snow activity too!

Need snowflake sprinkles? Get them on Amazon. (affiliate link)

I'm always trying to find new ways to help make sure that my toddlers eat healthy foods, which is why I love making cookies with less sugar and processed ingredients. That's why I am so excited about Dr. Orlena Kerek's FREE Online Workshop on How To Help Your Children Eat Healthily. (affiliate links) It's happening on Wednesday, January 28 and will be packed with information on creating healthy habits, introducing new foods without stress, and my favorite idea - nothing is forbidden in moderation.

I will definitely be participating as I have one very picky eater! My other toddler is a little more accepting of new foods but I want to make sure I have all the tools I can to keep him that way for life.

Be sure to check out this awesome FREE workshop (affiliate link) with me!

If you need even more guidance, check out Dr. Orlena's full Healthy Eating for Kids Course. (affiliate link) It includes:

  • 9 videos over 4 weeks
  • Personal coaching from Dr. Orlena
  • Access to a Facebook group and Course Materials
It is a great value as you can't put a price on healthy eating habits for life! 


Indoor Sensory Play with Snow


We had a snow day! It was so fun seeing my boys really enjoying playing in the snow for the first time. Last year they were just too little and hated it.

The next day we still had a lot of snow... but also wind chills around -6. I just couldn't take them out in that kind of cold, but they still really wanted to play in the snow. So what did we do? Brought the snow inside, of course!

I set up our old baby bathtub - it's my favorite sensory bin. It worked especially well for the snow because I could just drain it when we were done. I braved the cold and scooped some snow from our patio into the tub. Then I laid down a big water-repellant sheet and put the tub on top. Time to play!


I gave the boys some scoops and containers from the kitchen. I didn't know if they would want to touch the snow with their hands but they dove right in!


My truck lover grabbed several of his cars and practiced some snow driving.


While my animal lover decided to let his favorites do some playing in the snow.


He even made sure his hippo got a taste of a snowball!


This activity was so much fun - we did it 2 days in a row! As long as you've got some snow, a few scoops and bowls, and some water resistant toys you are all set. It was such a great way for my boys to experience snow play when the temperatures made it impossible to be outside for long. Next time you've got a snow day give it a try!

Looking for some snow inspired crafts? Try my Coffee Cup Snowman and Build a Snowman Busy Bag too!

Need any of the materials in this activity? Here you go: (affiliate links)


Protect your floors with a bleacher blanket from Thirty One! Shop here (consultant link)


Coffee Cup Snowman


We love snowmen in my house. I have lots of snowman decorations around the house in the winter, and of course, Olaf has become a very big celebrity with my boys.

I also love coffee. As I was making myself a cup this morning, I looked at my K-cup and thought hmmm... this could become part of a snowman (the mind of a blogger, right?). Since we have been stuck inside the house this week with colds and frigid temperatures I will take just about anything and make it into a craft project.


I cleaned out my K-cup, grabbed a few other things from my craft bin, and we made this really cute, easy snowman craft. It was great fine motor practice for my boys and turned out really well!


Please note: this activity features small parts. Children should be closely supervised when doing this craft. This craft may not be appropriate for all children.

You will need:


Clean, used K-cup
Black marker
Styrofoam cup
3 paper fasteners
3 pipe cleaners - 2 brown and one color of your choice

Directions:

Remove the foil, coffee, and liner from your K-cup. Thoroughly wash and dry.  Flip upside down, and draw on a face with black marker.


Thread a colored pipe cleaner through the hole in the top of the K-cup. Twist the top portion into your desired shape for a hat (ours was a bow). Be sure there is enough of the pipe cleaner coming through the bottom to stick through the styrofoam cup (at least an inch).

Now let your child assemble the snowman!

Have them punch the paper fasteners into the styrofoam cup for the buttons.


Push the 2 brown pipe cleaners into the sides of the cup to make arms. Twist the ends so that they form a V for hands.


Push the head onto the top of the cup, pushing the end of the pipe cleaner through the top to secure the head to the base.


All done! A happy snowman! He is now ready to join the rest of my snowman decorations. Since this craft does have small pieces, he is definitely a decoration and not a toy.

Like this snowman craft? Try my Build a Snowman Busy Bag next!

Need any of the materials used in this craft? Here you go! (affiliate links)


Looking for craft storage? Check out the storage & utility options available from Thirty-One! (consultant link)

10 Indoor Boredom Busters


Brrr! It was cold and rainy here yesterday and I had to pull out all my tricks to keep my kids entertained inside. Since it's just the beginning of bad weather season I thought I'd share some of my favorite easy indoor activities. These are perfect quick fixes to keep kids entertained during long days inside.


1. Have a picnic. Turn snack or meal time into an event! My toddlers find this so amusing. I just lay out a blanket in the living room and we pretend we are dining outside on a beautiful summer day. There's definitely a mess potential here but my boys are usually so taken with the novelty of eating on a blanket that they keep their food pretty well contained.

2. Make a fort. I'm all about intricate indoor forts but I promised this would be a list of easy activities.  When I'm in a pinch, I just throw a sheet over the kitchen table and call it done. Kids have amazing imaginations and I love to let them use them! The sheet fort is always a hit.


3. Pillow mountain. This is one of our favorites.  I just pile as many pillows as I can find - bed pillows, throw pillows, cushions, whatever - into a mountain in the living room and let them go. They have a ball climbing and diving on the "mountain." And its nice and soft so no one gets hurt.

4. Jumping on the bed. Similar to pillow mountain - we have an air mattress which I blow up and let them use as a trampoline. They love to bounce and tumble, and it's only a couple of inches off the ground so if they fall off it's OK. Just be sure to have plenty of space for this one so they don't roll off into a piece of furniture.

5. Sheet sleds. This one came about quite by accident when I was trying to fold laundry while my kids were playing (silly me!). Have them sit on the end of a sheet and hold on while you pull them around. My kids love this!


6. Turn off the lights. This works so well on these short days where it gets dark before dinner time. I turn off the lights, give them flashlights, and let them explore. Simple and fun!

7. Pipe cleaners, colanders, play dough. Look for fun things around the house that your kids can use to create. Mine love putting pipe cleaners into a colander and into play dough to create all sorts of wacky art.


8. Go swimming. In the bath tub! Letting them splash and play in the tub in the middle of the day is great fun. Add in some awesome toys, bath crayons, and bubbles and you're set.

9. Make a sensory bin. This might sound complicated but its just a tub filled with fun materials to explore. Check out my Farm Fun Bin for more details.


10. Give them a cardboard box. Seriously, this is all they need to be entertained sometimes. A huge box can become a car (push them around in it for major laughs!), a playhouse, an art canvas - let their imaginations go wild!

Hope these activities help you enjoy some of the long days ahead. I'd love to hear your favorite indoor boredom busters too!

Make Santa's Mailbox

My boys are 2, so they are just starting to understand the idea of Santa and Christmas. It's my favorite holiday, and I wanted to give them a Santa inspired activity that also incorporates their love of putting things into (and taking things out of) boxes. I also love any craft that reuses materials that I would normally throw away. I have a million empty wipes containers, and one became Santa's Mailbox!


This is a simple craft that recycles an empty baby wipes container. If you don't have one you can still make this out of an old tissue box - it just won't be as sturdy and it will be harder to get your notes back out. I'm hoping we can make this a family tradition as we write letters to Santa every year!

To make Santa's Mailbox, you will need:

  • Wipes container or tissue box
  • Felt - red, black, yellow
  • Cotton balls
  • Scissors
  • Mod Podge

First, remove the flip top lid from your wipes box as shown above. Measure and cut your felt pieces. I used a Huggies wipes box and the sizes of felt were:

  • Red - 4" wide by 23" long
  • Black - 1.5" wide by 11.5" long (2 of these)
  • Yellow - 2.5" square with an approximately 1" x 1.5" rectangle cut from the center

If you use a different size container your measurements will be different.

Coat the sides of your container with Mod Podge. 


Wrap your red felt around the container and pull tightly. You may need to apply a little more Mod Podge at the seam. Mine had a bit of overhang at the bottom which I trimmed with an x-acto knife once it was dry.


Allow to dry. Then put a very light coating of Mod Podge on the back of your 2 black rectangles. Wrap these around your container, leaving a space in the front center for your belt buckle.


Apply a light coating to the back of the yellow piece and adhere to the front center of your container.


Apply a coating of Mod Podge to the top of your container, leaving the opening clear, and apply cotton balls. Press gently to make sure they stick. Allow to dry.


Trim off any excess felt from the bottom of your container and you are done! Santa's ready for mail!


This makes the perfect spot for your kids to drop off their letters to Santa! And, if you have busy toddlers like me, it can provide hours of entertainment. My boys love putting all sorts of things into the box, then opening it and starting all over again.


You can also find a good use for all those holiday catalogs that are coming in the mail. They make great cutting practice for your little ones as they cut out pictures and drop them into Santa's mailbox. Fun and fine motor skills all in one!

We've also made "cookies" out of construction paper and fed them to Santa. One of my boys finds this particularly funny.

If you like this activity, be sure to check out our Decorate a Gingerbread Man and Build a Snowman Busy Bags too. Happy Holidays!

Decorate a Gingerbread Man: Busy Bag Activity

I have twins, so I always think of everything in twos. This busy bag activity has been awesome because I was able to make one with two playing areas on it!

If you like this busy bag activity, be sure to check out our snowman, turkey, and owl projects too!


You will need:
  • Felt - brown and green (or another background color of your choice)
  • Gingerbread man shaped cookie cutter (mine are from this set - affiliate link)
  • Mod Podge or fabric glue
  • Scissors
  • Pom pom balls
  • Pipe cleaners

Directions:

This project is so simple you can put it together quickly. First take your gingerbread man cookie cutter and trace 2 shapes onto brown felt.


Cut out your shapes and cover the backs with Mod Podge or fabric glue.


Adhere to your background piece of felt. Allow to dry.


Once dry, collect some pom pom balls and pipe cleaners to use as decorations. I cut the pipe cleaners to size and bent them to look like frosting lines. 

(Note: this project contains small pieces that may not be appropriate for all children. Supervise this activity at all times).


Here's what your decorated "cookies" look like! I gave these to my toddlers and they had a blast.


They first pulled all the pieces off then set about decorating their own "cookies". So much fun!


When we're done, I like to store our activities in Large Zipper Pouches from Thirty One.


It's the perfect size to hold everything (and much more!). The zipper keeps everything contained and when we are heading out to a restaurant or doctor's appointment I can just grab the bag, throw it in my purse, and keep my kids entertained on the go without using a screen.


I especially love this owl print (Hoo's Happy)! If you'd like to order one yourself, visit my Thirty One website(affiliate link)

I am an Independent Consultant for Thirty One Gifts. I receive a commission on products purchased through my website. Opinions expressed are solely mine.

Build A Snowman: Busy Bag Activity


I love busy bag activities for my toddlers because it's a quiet, screen free activity that we can take anywhere. We've been having a lot of fun with puzzle activities made from felt - check out our owl and turkey projects. Now that Christmas and winter are fast approaching, I thought we'd try a snowman. He might be our favorite yet!


Here's what you need:
  • Felt - white, black, brown, orange, and a background of your choosing
  • Googly eyes
  • 3 buttons
  • Velcro
  • Mod Podge or fabric paint
  • Bowls (for tracing)
  • Scissors
Directions:

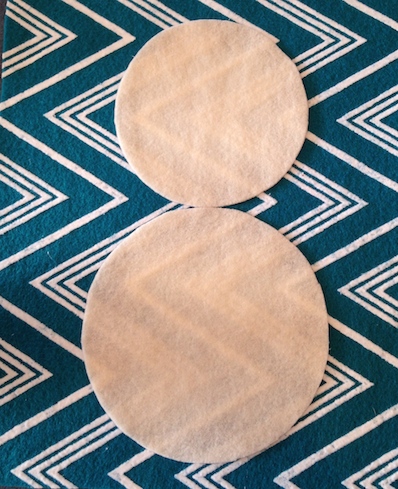
Start with your white felt. Trace 1 small and 1 larger circle (I used 2 bowls from my kitchen). Cut them out.


Apply Mod Podge or other fabric glue to the back of your circles.


Adhere circles to your background piece of felt. I had this cool patterned piece to use but any color is fine. Allow to dry.


While that is drying, collect your googly eyes and buttons. Attach a piece of velcro (the stiffer "hook" side only) to the back of each. 

(Note: this activity contains small parts and children should always be supervised while playing. If you are worried about small pieces, use felt circles for the eyes and buttons).


Then cut your felt pieces. You will need:
  • Carrot shape cut from orange felt.
  • Hat shape cut from black felt.
  • Scarf cut from red felt. Cut a rectangle and then make 2 small cuts in one end. Fluff the edges so it lays like the fringe on a scarf.
  • 2 arms from brown felt. Cut 2 equal sized rectangles with a triangle shape at the end. Make 2 small cuts at the larger end and fluff out for the "fingers."

Here are all the pieces together:


And your snowman once assembled:


I always give the puzzle to my toddlers fully assembled, then let them pull the pieces off and try to reassemble. They loved this one!


This is such a fun activity for them, and great for fine motor skills as well as spatial relations as they try to put all the pieces back in order.

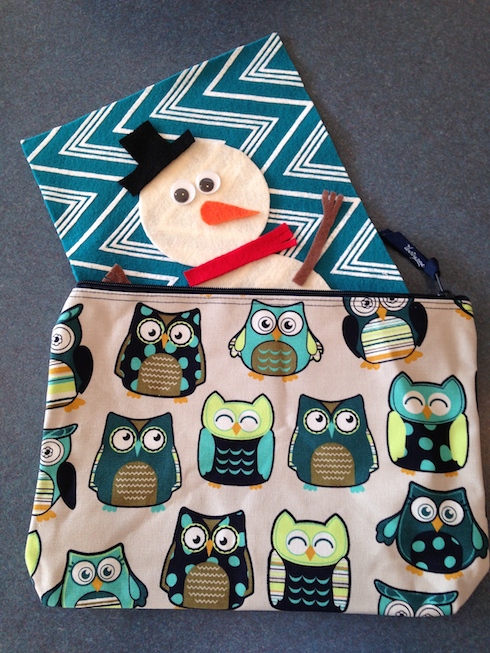
When we're done, I like to store our puzzles in these large zipper pouches from Thirty One. 


It's the perfect size to hold everything (and much more!). The zipper keeps everything contained and when we are heading out to a restaurant or doctor's appointment I can just grab the bag, throw it in my purse, and keep my kids entertained on the go without using a screen.

Seriously, I love these large zipper pouches - especially in the new owl print, Hoo's Happy! If you'd like to order one yourself, visit my Thirty One website. (affiliate link)

I am an Independent Consultant for Thirty One Gifts. I receive a commission on products purchased through my website. Opinions expressed are solely mine.


Leaderboard